

Pocket Guide
- Activate MX Records – Login to cPanel → click Zone Editor → hit Manage → tap MX option → choose Delete MX Record → Tap + Add users button.
- Activate Gmail – Sign in → choose Accounts → Domain → Manage Domain → hit Activate Gmail → tap Set up MX Record → Verify your email address → Tap Activate Gmail.
Google Workspace allows you to manage your data, users, and more from a single portal. With this, you can create, communicate and collaborate easily with the customers. It gives you access to many apps like Gmail, Calendar, Drive, Docs, Meet, etc. It is mandatory to pay a subscription amount to use Google Workspace on any app. For that, you have to Sign up first. It offers a 14-day free trial, and you can decide whether it will suit you or not. To activate your Google Workspace in Gmail, you should purchase it, verify it in the domain, and activate Gmail.
How to Set Up MX Records for Google Workspace
Before activating Gmail Google Workspace, adding the MX Records to your DNS zone is mandatory. Here are the simple procedures to add MX records with Google Workspace using cPanel.
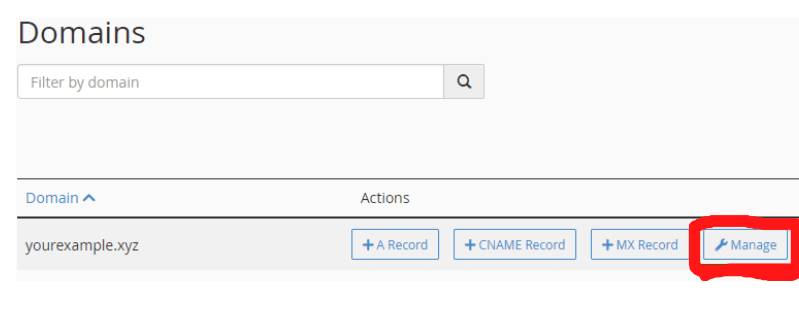
1. First, log in to your cPanel account and choose the Zone Editor menu that looks like a pencil icon.
2. Now, tap the Manage option next to the domain you wish to use in your Gmail.
3. Then, choose the MX option near the Filter and delete any existing MX records by tapping the Delete option next to the Record.
Information Use !!
Concerned about online trackers and introducers tracing your internet activity? Or do you face geo-restrictions while streaming? Get NordVPN - the ultra-fast VPN trusted by millions, which is available at 69% off + 3 Months Extra. With the Double VPN, Split tunneling, and Custom DNS, you can experience internet freedom anytime, anywhere.

4. A pop-up text will appear on your screen and ask Are you certain that you want to delete this record. Choose the Continue button to proceed.
5. Further, choose the +Add Record button in the top right corner of the table.
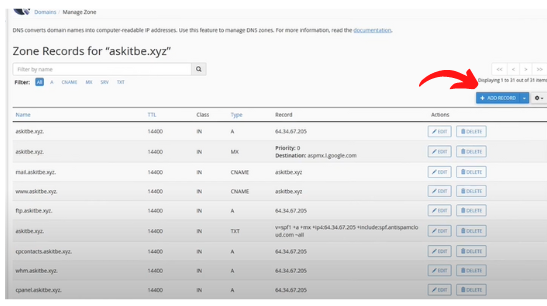
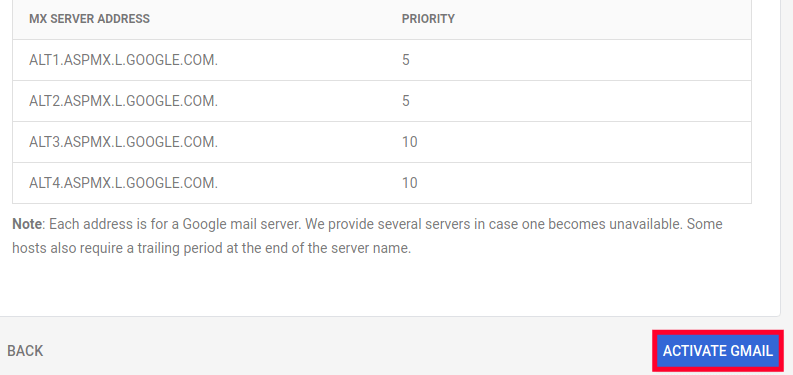
6. Finally, enter the information and tap the Add Record button. You have to add 5 MX Google Records.
Note: When you receive the “Unfortunately, Google Play Store has stopped” message, you uninstall the app and activate Google Play Store.
Steps to Activate Gmail for Google Workspace
1. To activate Gmail in Google Workspace, Sign in with your Google Workspace Admin Console.
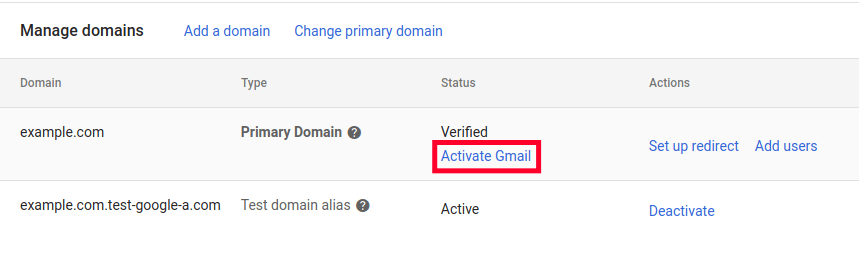
2. Under the navigation menu, select Accounts >> Domain >> Manage Domain option.
3. After seeing the domain list, choose the Activate Gmail button under the Status tab.
4. You will see a pop-up text on your screen that says, Choose a method to activate Gmail. You should select the Setup MX record option and tap the Next button to proceed forward.
5. On the next tab, check the boxes below and verify that you added all the email addresses for your domain also, check that you are ready to receive an email for your domain at Gmail. After checking all these details, hit the Continue button.
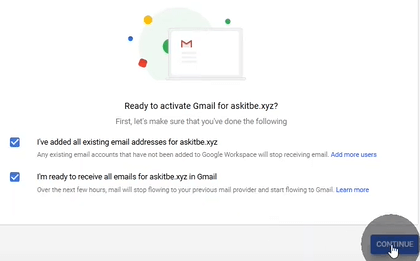
6. Scroll down and hit the Activate Gmail option that appears blue, and now your settings will be verified.
7. Finally, you will see Verified Gmail activated status in your domain.

Note: Once activated, you can manage all your email accounts linked with Google Workspace. If you have all queries in managing the account, then you can visit the Google Workspace page.
FAQ
First, sign in to your Google Admin console (While Signing in, use your administrator account that doesn’t end with @ gmail.com). Choose the Admin Console in the top right corner and hit the Get Help option. Finally, tap Contact Support under the Help window.
You can use Gmail for free, whereas Google Workspace isn’t free. Gmail users can get access to up to 15 GB of cloud storage, and Google Workspace users can access 30 GB of storage.
Yes, every Google Space Subscription includes custom email, video meetings, and more.
Disclosure: If we like a product or service, we might refer them to our readers via an affiliate link, which means we may receive a referral commission from the sale if you buy the product that we recommended, read more about that in our affiliate disclosure.