

Have you bought a new TCL Smart TV to watch your favorite movies and shows in high-definition? Voilà, you’ve made the right choice. TCL is one of the best brands for Smart TVs with Dolby Vision HDR, Dolby Atmos, Google Assistant Integration, and many more. Before accessing the content for the first time, you must setup your TCL Smart TV without breaking the algorithm.
Also, if you’ve performed a factory reset on your TCL TV, all the data will be erased and revert to the factory defaults. You can follow the setup procedure to access your TCL TV in such cases.
However, the TCL TV setup procedure is easy, irrespective of the operating systems it is available. So, we’re here to guide you through the step-by-step procedure to set up your TCL Smart TV within a few minutes.
Information Use !!
Concerned about online trackers and introducers tracing your internet activity? Or do you face geo-restrictions while streaming? Get NordVPN - the ultra-fast VPN trusted by millions, which is available at 69% off + 3 Months Extra. With the Double VPN, Split tunneling, and Custom DNS, you can experience internet freedom anytime, anywhere.
Before you Set Up TCL Smart TV
Before setting up your TCL TV, make sure to do the following:
- Unbox the TCL TV from the package and mount the TV by reading the user guide.
- Buy the respective HDMI cables to connect external devices (soundbar, speaker, subwoofer, etc.).
- If you’re using a wired connection to fetch the internet, make sure to buy an ethernet cable.
- Plug the power cable into the wall outlet and power on your TCL TV.
Note: There’s no need to pair your TCL remote control to your TCL TV that comes along the package during the setup process. On the contrary, if you’re purchasing a new TCL TV remote, you must press the Home and OK buttons to pair it with your TCL TV.
How to Setup TCL Roku TV
1. Connect the power source to the wall outlet to turn on your TCL Roku TV.
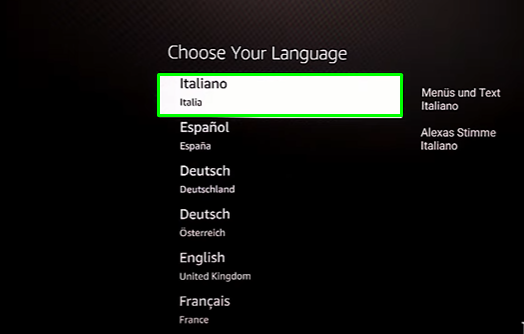
2. Once turned on, choose the language of your choice using the TCL Roku remote.
3. From the next screen, choose your region.
4. From the Set Up Environment section, select the Set Up for Home Use option.
Note: Select the Set Up Store Use option if you’re using the TCL Roku TV for your store.
5. Choose your preferred network (Wireless or Wired) in the Connect to the Internet section.
6. If you’re choosing a Wired (Ethernet) connection, your TV will automatically connect to the internet once you connect the ethernet cable to the WiFi router and TV.
7. For Wireless connection, click Set Up New Wireless Connection to proceed further.
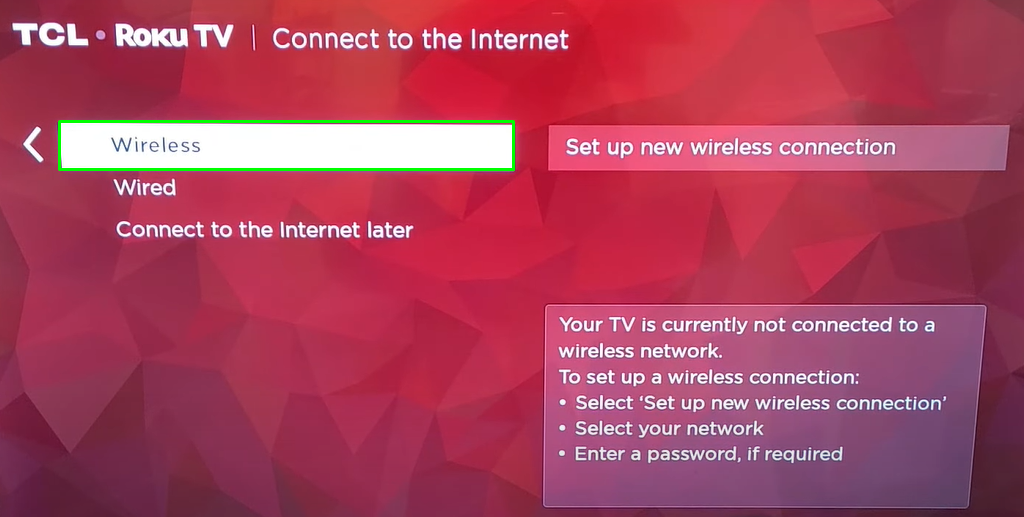
8. Now, choose your WiFi network from the list of available devices, enter the WiFi password, and click Connect to establish a wireless connection.
9. Once the connection has been established, your TCL Roku TV will check for new software updates.
10. If any updates are available, click the OK button from the popup to update your TCL TV to its latest firmware.
11. Once updated, your TCL TV will automatically restart and display the Activate your TV page.
12. Now, click the Enter your Email Address option and enter your email linked with your Roku account if you already have one.
Note: If you don’t have a Roku account, visit the Roku website and create a new account for the setup.
13. Now, enter your email address in the respective field and click Continue.
14. An activation link will be sent to your email address associated with your Roku account.
15. Open the mail on your smartphone or PC and verify your Roku account.
16. After that, follow the on-screen prompts on your smartphone to add previous channels to your TCL Roku TV.
17. Press the Right button on your TCL Roku remote and select Everything is plugged in and turn on or Do this Later to complete the setup.
18. Press the OK button from the All Done screen.
19. Now, the Roku TV intro will pop up on your screen. Press the Volume button on your remote control to skip the intro part.
Finally, the setup procedure is completed, and the Home screen will display on your TCL Roku TV. After setting up, you can navigate to the Roku Channel Store to manage apps accordingly.
How to Setup TCL Android TV
1. Connect the power socket to the wall outlet and turn on your TCL Android TV.
2. Choose your preferred language using the remote control.
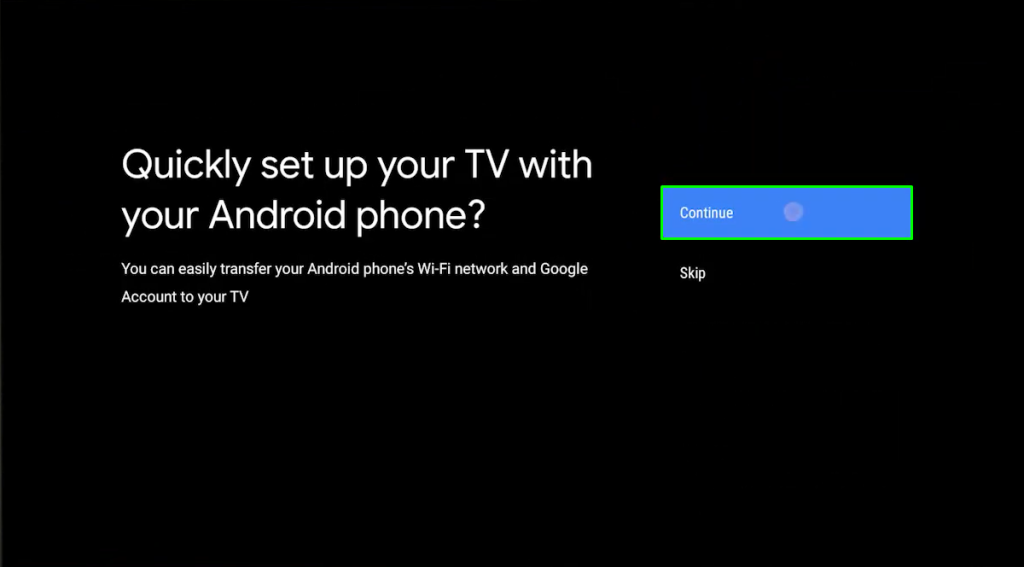
3. From the next screen, click Continue if you want to set up your Android smartphone with your TCL TV to set up without a remote. Else, click Skip to proceed with the next step.
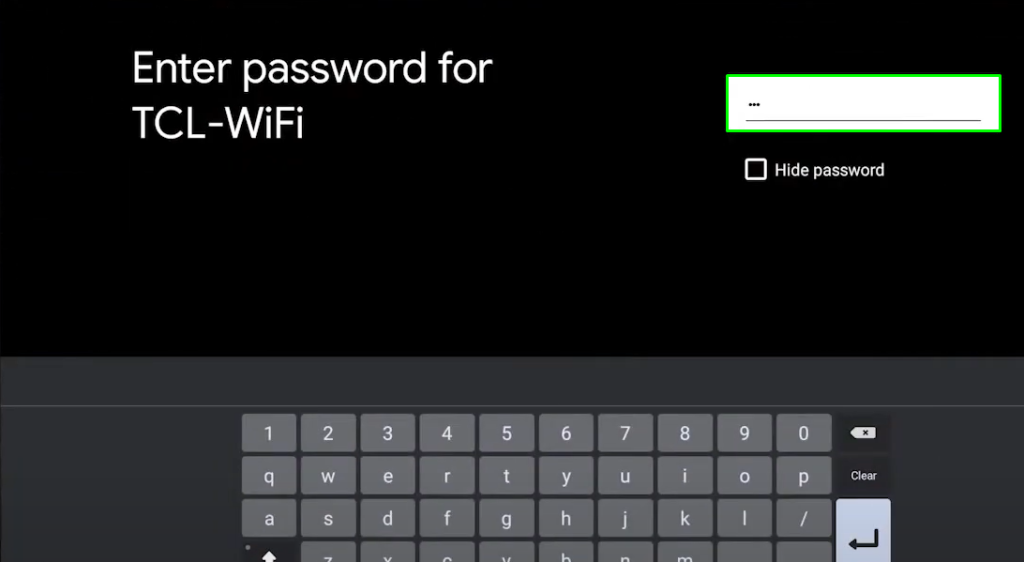
4. Then, choose your WiFi network from the list of available networks.
Note: Selecting your WiFi network step will be automatically skipped if you’ve already hooked up to the internet via an ethernet cable.
5. After choosing the WiFi network, enter the respective password to connect your TCL TV to a WiFi network.
6. Once the connection has been established, wait a few seconds to view the sign-in page.
7. From there, you can click the Sign In button to sign in to your Google account to get your favorite apps, updates, and everything you need. You can also Skip the step if it isn’t necessary.
8. While signing in, click the Use your remote option to sign in with your remote control. Otherwise, click Use your phone or Computer to sign in using your smartphones or tablets without using a remote.
9. If you’ve selected Use your remote, enter your Google credentials (email address and password) using the on-screen keyboard and click Next.
Note: If you don’t have a Google account, visit Google’s official website from a web browser and create a new account for signing in to your TCL Android TV.
10. After signing in, read Google’s Terms of Service and click Accept.
11. Moreover, if you want to elevate your streaming experience, you can enable the Location services by selecting Yes from the next page.
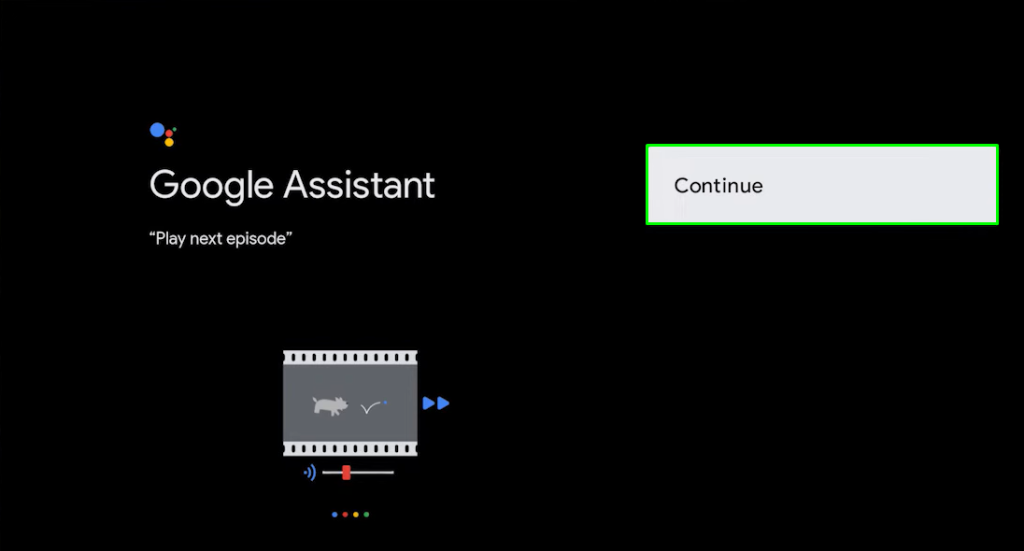
12. After that, you can get better voice control for your TV by setting up Google Assistant. Click Continue to proceed further.
13. Further, select Continue from the Services and your privacy section.
14. Now, you can activate the Google Assistant feature by selecting Turn On. After that, you can command “OK Google” from your TCL remote to perform actions.
15. Next, choose the name of your Smart TV Pro. If you want a custom name, click the Enter custom name option, input the name using the virtual on-screen keyboard, and click Enter.
16. After setting up the name for your TCL TV, there’s a quick introduction to the Android environment.
17. Just go through the steps and select your Environment, either Home or Shop.
18. From the next screen, choose your Country/Region.
19. From the Channel Installation page, click Scan Automatically if you’ve setup the antenna to your TCL Android TV. If not, click Skip.
20. If you’re scanning the channels, select the Channel Type ( Digital, Analogue, or Digital & Analogue) and select the Search button. Now, your channels will start to tune.
21. Once the channel installation procedure is completed, click Skip.
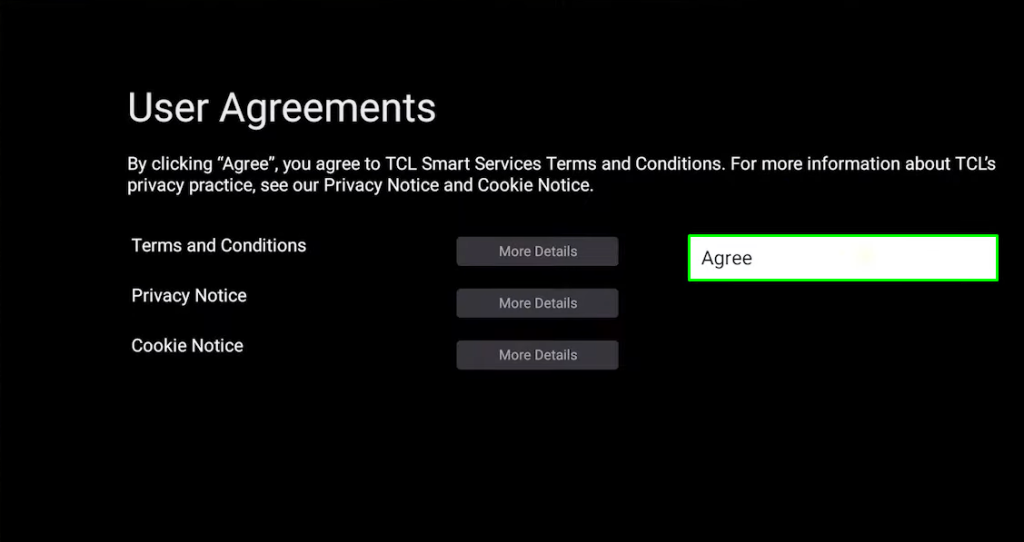
22. Then, Agree to the User Agreements from Android TV to complete the setup.
Finally, the Home screen of TCL Android TV will display. You can click the Apps section to install your favorite apps on TCL Android TV.
Setting Up TCL Google TV
1. Initially, ensure to plug in the power cable to the power socket and turn on your TCL Google TV.
2. From the welcome screen, choose your preferred language using the Google TV remote.
3. After selecting your language, you can choose Set Up Google TV or Set Up Basic TV.
- Set Up Google TV – Sign in with your Google account to watch your favorite movies and shows, including personalized recommendations and voice controls (Google Assistant).
- Set Up Basic TV – Continue the setup without signing into your Google account. You can still get live TV channels when connected to the antenna.

Note: It is recommended to sign in with Google TV to get the full Google TV experience.
4. While setting up with Google TV, select your WiFi network from the list of available networks.
5. Enter the respective WiFi password to establish a stable internet connection.
6. After connecting your TCL Google TV with WiFi, your Google TV will automatically check for available updates.
7. If there are any updates available for your Google TV, click Download and Update to update your TCL Google TV immediately.
Note: Click Download in background to continue the setup procedure while the updates are downloading in the background.
8. Once the update is completed, Sign in using your Google Account. Enter your email address and password using the virtual on-screen keyboard.
9. After signing in, click Continue from the Google Assistant page.
10. If you want to get the full Assistant experience, click Turn On and follow the prompts to set up your Google Assistant on TCL Google TV. If not, click No Thanks to proceed further.
11. If you have subscribed to a streaming service using the same Google Account, the respective apps will be listed on the setup screen.
12. Further, select the apps from the recommendations and click the Confirm option. Now, the selected apps will be installed on your TCL Google TV after the setup.
13. Choose the Location of your device, either Home (for personal use) or Store (for display purposes in rental stores).
14. After that, choose the Time Zone and click the Log In option from the next screen.
15. Now, you have the option to sign in with your same TCL account on your TV and the Home app on your smartphone to control your TV with a remote app.
16. Next, Agree to the User Agreements.
17. From the next screen, click Allow to keep your Google TV up to date.
18. Further, press the Home and OK buttons on your TCL remote to complete the setup process.
19. After that, the apps you’ve chosen will start installing on your TCL Google TV.
20. Finally, click the Start Exploring option on the TV screen to finish the setup.
Now, you can navigate to the home screen on your TCL Google TV to start installing apps and browse the internet.
How to Setup TCL Fire TV
1. Power on your TCL Fire TV by plugging the power cable into the wall outlet.
2. Select your Location on your TCL Fire TV using the remote control and press OK.
3. Then, choose your preferred language to proceed further.
4. Then, click Continue to proceed with the setup process.
Note: You can also click the In Store Use option while setting up to use your TCL Fire TV for store display purposes.
5. From the next screen, click Activate to fetch the WiFi network nearby.
6. Choose your WiFi network from the list of nearby available networks. Enter the WiFi password to connect your TCL Fire TV to a WiFi network.
6. After setting up the WiFi, it will automatically download the latest software and begin to update the TCL Fire TV.
7. Now, your TCL TV will automatically reboot and display the sign-in screen.
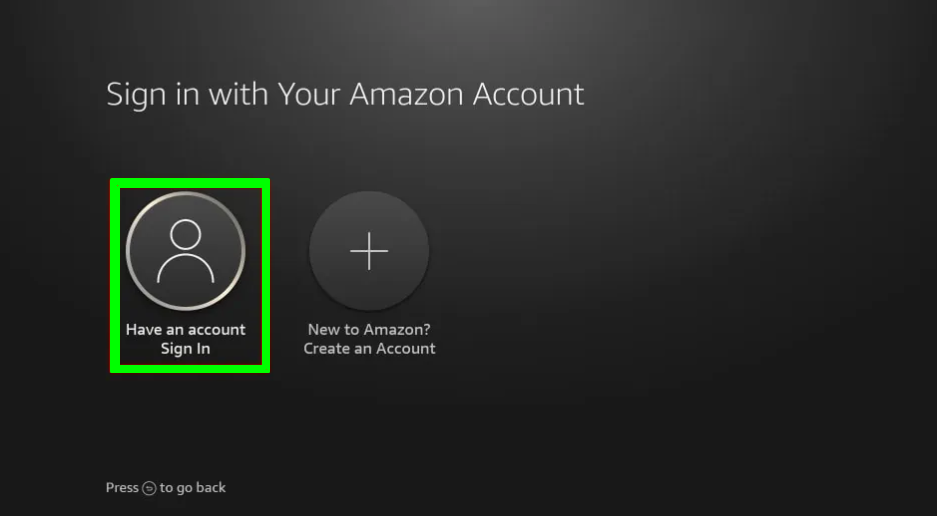
8. If you have an Amazon account, click Have an Account Sign In, and sign in to your existing Amazon account. If not, click New to Amazon Create an Account and create a new Amazon account for your TCL Fire TV.
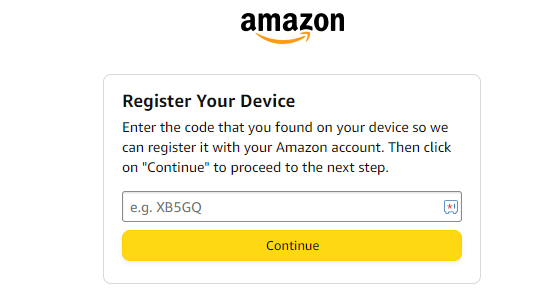
9. While signing in, fetch your smartphone and visit the Amazon website. Enter the Activation code displayed on your Fire TV and click Continue.
10. Click Continue to agree to the terms and conditions.
11. From the next screen, click the Restore option to restore your Fire TV with your current apps, privacy settings, and control settings. If not, click Skip.
12. If you’ve skipped the Restore steps, you’ll be directed to the Parental Control page. From there, you can click Enable Parental Controls and set up the parental control feature for security purposes.
13. If not, click No Parental Controls to proceed further.
14. Now, you’ll be asked to choose your Streaming Services, click Get Started, and complete the on-screen prompts to finish the procedure. If not, click No, Thanks to continue the setup.
15. A Welcome screen will display on your TCL Fire TV. Click the Got It button.
16. After that, the Scan for TV Channels popup will display on your TCL Fire TV. Click Yes and set up the TV channels for your TCL Fire TV.
17. If not, click No to complete the setup.
18. Finally, choose the Profile from the Who’s Watching Fire TV screen and click OK.
Now, the TCL Fire TV home menu will display on your screen. Navigate to the Your Apps & Channels to view your installed apps on your Fire TV.
FAQ
Yes, you can skip the option for connecting the TV to WiFi to set up your TCL Android or Roku TV without the internet.
In rare cases, your TCL TV will get stuck on the startup screen during the initial setup. This is due to the temporary malfunction of the hardware or operating system. In such cases, you can perform a simple restart to fix the issue.
Disclosure: If we like a product or service, we might refer them to our readers via an affiliate link, which means we may receive a referral commission from the sale if you buy the product that we recommended, read more about that in our affiliate disclosure.